Writing your first adapter
This tutorial will help you to write your first adapter for OctoMesh.
For abreviation we will ensume that you have already a running OctoMesh instance as well as the octo-cli installed.
We will execute the following steps:
- Create a new adapter project
- Make the minimal configuration to be able to run the adapter
- Implement the adapter logic
- Implement a pipeline logic
Create a new adapter project
Create a new .NET Core console application and add the following NuGet packages:
Meshmakers.Octo.Sdk.Common
To have logging output you can include the following configuration file (nlog.config) make sure it is copied to the output directory.
<?xml version="1.0" encoding="utf-8"?>
<nlog xmlns:xsi="http://www.w3.org/2001/XMLSchema-instance" xmlns="http://www.nlog-project.org/schemas/NLog.xsd">
    <targets>
        <target name="console" xsi:type="ColoredConsole"
                layout="${message} ${onexception:Exception information\:${exception:format=type,message,method,StackTrace:maxInnerExceptionLevel=5:innerFormat=type,message,method,StackTrace}}" />
        <target name="file" xsi:type="File" fileName="Logfiles\${processname}-${processid}-Log.txt"
                layout="${level} ${message} ${onexception:Exception information\:${exception:format=type,message,method,StackTrace:maxInnerExceptionLevel=5:innerFormat=type,message,method,StackTrace}" />
    </targets>

    <rules>
        <logger name="*" minlevel="Debug" writeTo="console,file" />
    </rules>
</nlog>
Make the minimal configuration to be able to run the adapter
To run an adapter we need a new tenant, where we enable communication and create a new adapter.
# login to OctoMesh
octo-cli -c Config -asu "https://localhost:5001/" -isu "https://localhost:5003/" -bsu "https://localhost:5009/" -csu "https://localhost:5015/" -tid "adaptertest"
octo-cli -c Login -i


# Create a new tenant
octo-cli -c Create -tid adaptertest -db adaptertest
octo-cli -c Configure -tid adaptertest
octo-cli -c EnableCommunication
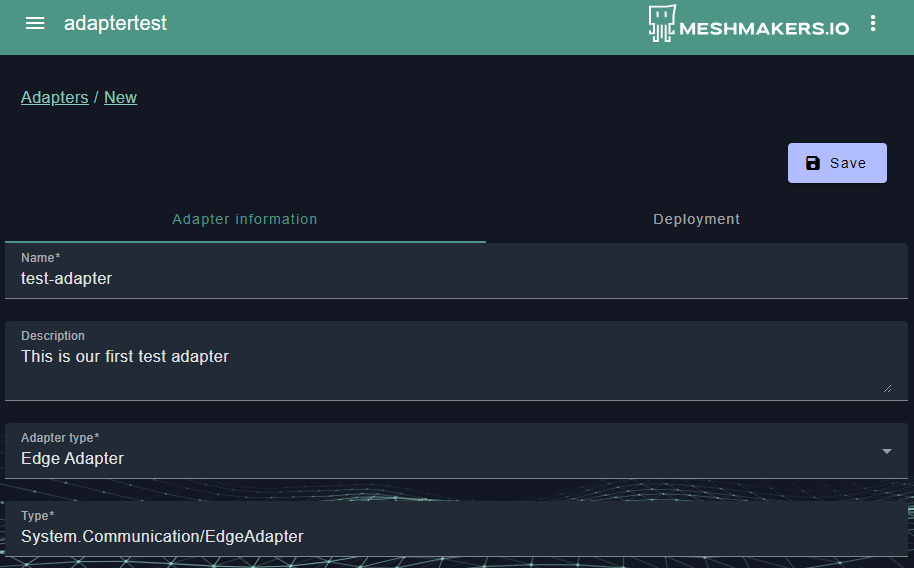
Navigate to the AdminUI and create a new adapter:
With a simple query we can get the configuration for the adapter:
query {
  runtime {
    systemCommunicationAdapter {
      items {
        rtId
        ckTypeId
        name
      }
    }
  }
}
Which will return a result like the following:
{
  "data": {
    "runtime": {
      "systemCommunicationAdapter": {
        "items": [
          {
            "rtId": "66793eb0d56225bac531bd04",
            "ckTypeId": "System.Communication/EdgeAdapter",
            "name": "test-adapter"
          }
        ]
      }
    }
  }
}
With that information we can move to the next part.
Implement the adapter logic
In your main class start with configuring the adapter.
using Meshmakers.Octo.Sdk.Common.Adapters;
using Meshmakers.Octo.Sdk.Common.EtlDataPipeline;
using Meshmakers.Octo.Sdk.Common.EtlDataPipeline.Configuration;
using Microsoft.Extensions.DependencyInjection;
using Microsoft.Extensions.Logging;


// Set the configuration for the adapter.
// In a real production environment this properties would be set externaly as environment variables.
// For more configuration options see Meshmakers.Octo.Sdk.Common.Adapters.AdapterOptions
Environment.SetEnvironmentVariable("OCTO_ADAPTER__AdapterRtId", "66793eb0d56225bac531bd04");
Environment.SetEnvironmentVariable("OCTO_ADAPTER__TENANTID", "adaptertest");


var builder = new AdapterBuilder();
builder.Run([], (context, services) =>
{
    services.AddSingleton<IAdapterService, MyFirstAdapterService>();
});
Next we have to implement the IAdapterService interface.
public class MyFirstAdapterService(ILogger<MyFirstAdapterService> logger,
IPipelineExecutionService pipelineExecutionService) : IAdapterService
{
    public Task StartupAsync(AdapterStartup adapterStartup, CancellationToken stoppingToken)
    {
        logger.LogInformation("Hello world from the adapter");

        // this is a plain string from the adapter configuration and can be configured in the AdminUI.
        // it would make sense to use a json object here but anything is possible.
        var config = adapterStartup.Configuration.AdapterConfiguration;

        return Task.CompletedTask;
    }

    public Task ShutdownAsync(AdapterShutdown adapterShutdown, CancellationToken stoppingToken)
    {
        logger.LogInformation("Goodbye world from the adapter");

        // this part will be called when the adapter is either stopped or receives an updated configuration.

        return Task.CompletedTask;
    }
}
After this steps you can run the adapter and see the log output.
In the UI you should see the adapter to be online!
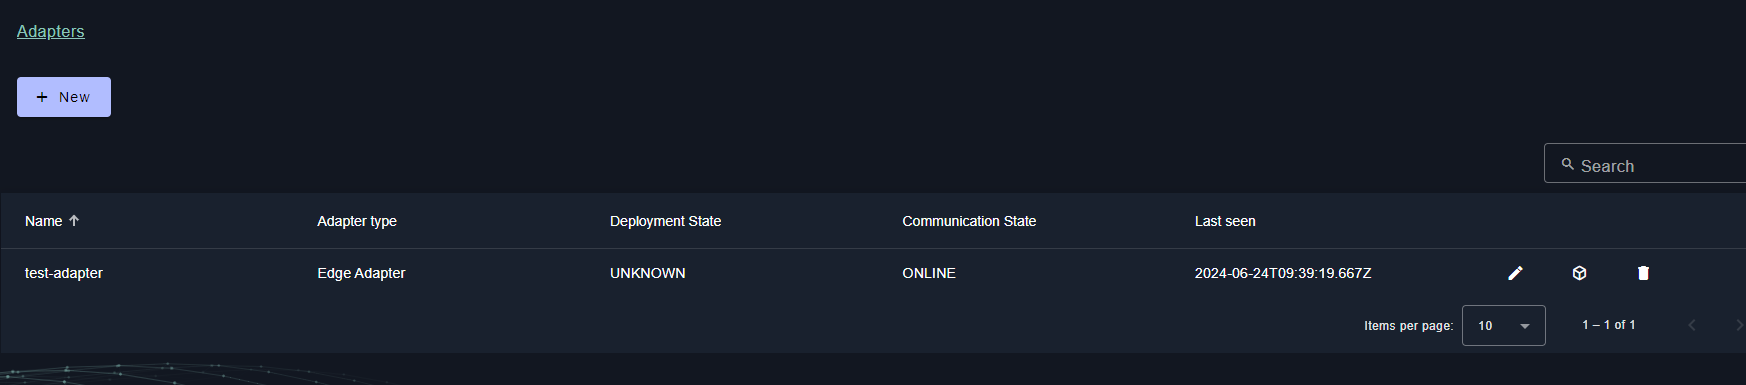
Now we proceed to the next step.
Implement a pipeline logic
First we have to modifiy the startup configuration to include the pipeline.
var b = new AdapterBuilder();
b.Run([], (context, services) =>
{
    services.AddDataPipeline()
        .RegisterNode<MyTestPipeline>()
        .RegisterEtlContext<IAdapterEtlContext>();

    services.AddSingleton<IAdapterService, MyFirstAdapterService>();
});
Next we have to implement the pipeline logic.
[NodeConfiguration(typeof(MyNodeConfiguration))]
public class MyTestPipeline(NodeDelegate next) : IPipelineNode
{
    public async Task ProcessObjectAsync(IDataContext dataContext)
    {
        dataContext.Logger.Info(dataContext.NodeStack.Peek(), "Hello world from the pipeline");

        //here we can decide if we want to continue with the next node or not
        await next(dataContext);
    }
}


[NodeName("MyPipeline", 1)]
public class MyNodeConfiguration : NodeConfiguration;
Now we have to update the adatper service to include the pipeline execution.
public class MyFirstAdapterService(ILogger<MyFirstAdapterService> logger,
    IPipelineExecutionService pipelineExecutionService) : IAdapterService
{
    private System.Timers.Timer? _timer;
    public Task StartupAsync(AdapterStartup adapterStartup, CancellationToken stoppingToken)
    {
        logger.LogInformation("Hello world from the adapter");

        // this is a plain string from the adapter configuration and can be configured in the AdminUI.
        // it would make sense to use a json object here but anything is possible.
        var config = adapterStartup.Configuration.AdapterConfiguration;

        foreach (var pipelineconfig in adapterStartup.Configuration.Pipelines)
        {
            // let the pipeline execution service know about the pipeline
            pipelineExecutionService.RegisterPipeline(adapterStartup.TenantId, pipelineconfig);
        }


        // and now we have to create a trigger when the pipeline should be executed.
        // this can be done by a timer, a message from a 3rd party api or anything else.

        _timer = new(10_000);

        // data can be whatever you want to pass to the pipeline.
        var data = new Dictionary<string, object>();

        _timer.Elapsed += (sender, args) =>
        {
            pipelineExecutionService.ExecuteAllPipelinesAsync(new ExecutePipelineOptions(DateTime.Now), data);
        };
        _timer.Start();


        return Task.CompletedTask;
    }


    public Task ShutdownAsync(AdapterShutdown adapterShutdown, CancellationToken stoppingToken)
    {
        logger.LogInformation("Goodbye world from the adapter");

        // this part will be called when the adapter is either stopped or receives an updated configuration.

        // cleanup
        pipelineExecutionService.UnregisterAllPipelines(adapterShutdown.TenantId);
        _timer!.Stop();
        _timer = null;

        return Task.CompletedTask;
    }
}
The last step in the puzzle is to configure the pipeline in the AdminUI.
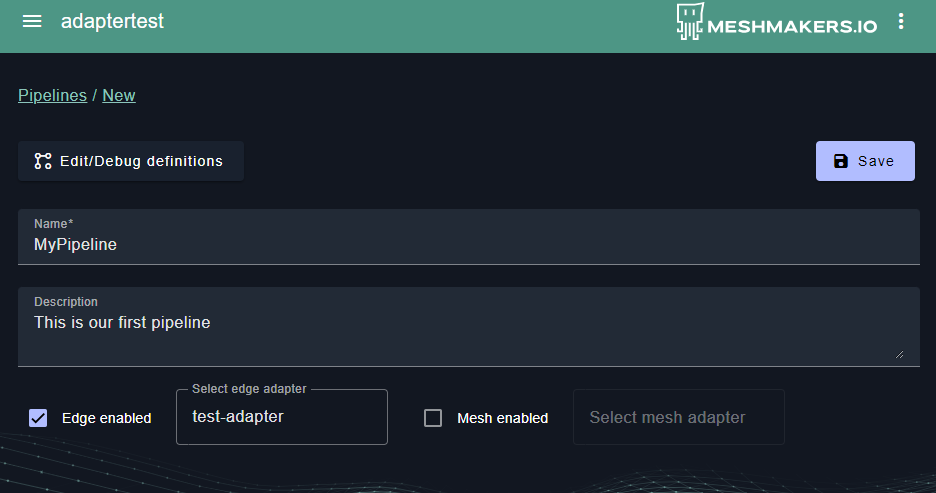
Now we have told the adapter to exectute the pipeline, but we have to configure the pipeline, which can also be done in the AdminUI.
By hitting the Edit/Debug definitions button after saving the pipeline you can see a ui where to enter the pipeline definition.
transformations:
  - type: MyPipeline@1
    description: I am a pipeline
After saving that you can see the the adapter restarts and the pipeline is executed every 10 seconds.
Execute pipeline System.Communication/EdgePipeline@667958e8170df58484742f1d
Executing pipeline
MyPipeline@1: Forward Executing
MyPipeline@1: Hello world from the pipeline
MyPipeline@1: Reverse completed
Pipeline completed
The source code of this adapter can be found in the following repository.